OpenGL Graphics Primitives
点 The Vertex
所有的几何原语都是用顶点来描述的,顶点是定义点本身的坐标、线段的端点或多边形的角。
为了在OpenGL中绘制一个顶点,我们使用OpenGL函数 glVertex。该功能有以下变化:
1 | void glVertex2d( GLdouble x, GLdouble y ) |
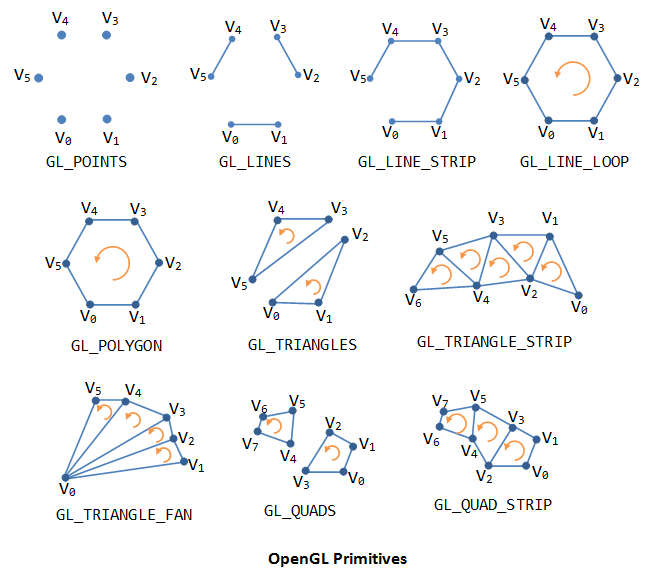
绘制OpenGL图元 :
1 | glBegin (mode); |
mode是图元类型
glBegin()与glEnd()之间只能使用下列OpenGL函数:
| 函数 | 函数的作用 |
|---|---|
| glVertex*() | 设置顶点坐标 |
| glColor*() | 设置RGBA颜色 |
| glIndex*() | 设置颜色索引 |
| glSecondaryColor*() | 设置纹理应用后的辅助颜色 |
| glNormal*() | 设置法线向量坐标 |
| glMaterial*() | 设置材料属性 |
| glFogCoord*() | 设置雾坐标 |
| glTexCoord*() | 设置纹理坐标 |
| glMultiTexCoord*() | 为多重纹理设置纹理坐标 |
| glVertexAttrib*() | 设置通用的顶点属性 |
| glEdgeFlag*() | 控制边界的绘制 |
| glArrayElement*() | 提取顶点数组数据 |
| glEvalCoord(), glEvalPoint() | 生成坐标 |
| glCallList(), glCallLists() | 执行显示列表 |
基础图元类型
| 类型 | 说明 |
|---|---|
| GL_POINTS | 单个顶点集 |
| GL_LINES | 多组双顶点线段 |
| GL_POLYGON | 单个简单填充凸多边形 |
| GL_TRAINGLES | 多组独立填充三角形 |
| GL_QUADS | 多组独立填充四边形 |
| GL_LINE_STRIP | 不闭合折线 |
| GL_LINE_LOOP | 闭合折线 |
| GL_TRAINGLE_STRIP | 线型连续填充三角形串 |
| GL_TRAINGLE_FAN | 扇形连续填充三角形串 |
| GL_QUAD_STRIP | 连续填充四边形串 |

1 | void glPointSize(GLfloat size); |
- 参数size设置点的宽度(以象素为单位),必须大于0.0,缺省时为1.0。
线 Lines
1 | void glLineWidth(GLfloat width); |
- 设置线宽(以象素为单位)。参数width必须大于0.0,缺省时为1.0。
1 | void glEnable(GL_LINE_STIPPLE); |
- 在绘制虚点线之前必须先启动虚点模式,即调用函数glEnable(GL_LINE_STIPPLE);结束时,调用glDisable(GL_LINE_STIPPLE)关闭。
多边形 Polygon
将多边形渲染为点集、轮廓线或者实体
多边形面的反转和裁减
1 | void glPolygonMode(GLenum face, GLenum mode); |
void glPolygonMode(GLenum face, GLenum mode);
Use this function in order to change how the polygon will be rendered. By default, the polygon is filled with the current color. However, we can disable filling the polygon and display its outline or the vertices forming it.
Parameter Description Values face Specifies which face of polygons is affected by the mode change. GL_FRONTGL_BACKGL_FRONT_AND_BACKmode Specifies the new drawing mode. GL_FILLis the default, producing filled polygons.GL_LINEproduces polygon outlines, andGL_POINTonly plots the points of the vertices.GL_FILLGL_LINEGL_POINT
//
1 | void glFrontFace(GLenum mode); |
//TODO
1 | void glCullFace(GLenum mode); |
Program View
The program basically consists of 4 visible components: Vertices, Primitives, Grid, and Background. Here is the functionality supported by the program that allows you to manipulate the view of these components.
- Vertices
- IncreaseVertex Size. Click 'X' to increase size and 'x' to decrease size. You can also select the +- menu items under Vertexsize.
- Change the vertex Color. You can do this by selecting the VertexColor menu items.
- Showthe vertices. Click the 'p' key or select the Show/Hide Points menu item under the Vertex submenu.
- Showthe numbers associated with vertices. click the 'n' key or select the Show/Hide Numbers menu item under the Vertex submenu.
- Primitives
- Change the primitive Color. You can do this by selecting the Primitivemenu items or by pressing the Up and Down keys.
- Change point size if the primitive is a point. Click 'S' to increase size and 's' to decrease size. You can also select the +- menu items under Primitivesize.
- Change line width in case the primitive is a line. Click 'L' to increase width and 'l' to decrease width. You can also select the +- menu items under Primitivewidth.
- Showthe primitive border and change the border color if the primitive is a polygon. You can change border color and showborder using the menu items under Primitive.
- Grid
- IncreaseGrid Line Width. Click 'W' to increase width and 'w' to decrease width. You can also select the +- menu items under Gridwidth.
- Change the grid lines color. You can do this by selecting the Back Color menu items.
- Showthe grid. Click the 'g' key or select the Show/Hide Grid menu item under the Grid submenu.
- Background
- Change the background color. You can do this by selecting the Back Color menu items.
顶点和颜色函数表:
1
2
3
4
5
6
7
8
9
10
11
12
13
glVertex2f( x, y ); glVertex2fv( xyArray );
glVertex2d( x, y ); glVertex2dv( xyArray );
glVertex2i( x, y ); glVertex2iv( xyArray );
glVertex3f( x, y, z ); glVertex3fv( xyzArray );
glVertex3d( x, y, z ); glVertex3dv( xyzArray );
glVertex3i( x, y, z ); glVertex3iv( xyzArray );
glColor3f( r, g, b ); glColor3f( rgbArray );
glColor3d( r, g, b ); glColor3d( rgbArray );
glColor3ub( r, g, b ); glColor3ub( rgbArray );
glColor4f( r, g, b, a); glColor4f( rgbaArray );
glColor4d( r, g, b, a); glColor4d( rgbaArray );
glColor4ub( r, g, b, a); glColor4ub( rgbaArray );
1 | glVertex2f( x, y ); glVertex2fv( xyArray ); |
Demo
1
2
3
4
5
6
7
8
9
10
11
12
13
14
15
16
17
18
19
20
21
22
23
24
25
26
27
28
29
30
31
32
33
34
35
36
37
void display() { // Display function will draw the image.
glClearColor( 0, 0, 0, 1 ); // (In fact, this is the default.)
glClear( GL_COLOR_BUFFER_BIT );
glBegin(GL_TRIANGLES);
glColor3f( 1, 0, 0 ); // red
glVertex2f( -0.8, -0.8 );
glColor3f( 0, 1, 0 ); // green
glVertex2f( 0.8, -0.8 );
glColor3f( 0, 0, 1 ); // blue
glVertex2f( 0, 0.9 );
glEnd();
glutSwapBuffers(); // Required to copy color buffer onto the screen.
}
int main( int argc, char** argv ) { // Initialize GLUT and
glutInit(&argc, argv);
glutInitDisplayMode(GLUT_SINGLE); // Use single color buffer and no depth buffer.
glutInitWindowSize(500,500); // Size of display area, in pixels.
glutInitWindowPosition(100,100); // Location of window in screen coordinates.
glutCreateWindow("GL RGB Triangle"); // Parameter is window title.
glutDisplayFunc(display); // Called when the window needs to be redrawn.
glutMainLoop(); // Run the event loop! This function does not return.
// Program ends when user closes the window.
return 0;
}
1 |
|
Demo
1 | //点的大小,直线线型和线宽的示例 |
相关链接
https://www.khronos.org/opengl/wiki/Primitive
https://www3.ntu.edu.sg/home/ehchua/programming/opengl/CG_Introduction.html
https://www.codeproject.com/Articles/23991/OpenGL-Geometric-Primitives
Rendering Primitives with OpenGL
https://www.glprogramming.com/red/index.html
https://github.com/wzpan/orgwiki/blob/master/opengl_vertex.org